Sewing a Pocket Nappy, a step by step guide.
These instructions are for a PUL Pocket nappy secured with snaps.
To make this nappy you will need:
* 50 cm x 53 cm piece of PUL (or of polar fleece and waterproof nylon (see notes at the bottom))
* 50 cm x 53 cm piece of microfleece (or microsuede)
* 35 cm x 9 cm piece of scrap microfleece or PUL to reinforce the PUL at the snap/loop point (you don't need this for a fleece & nylon pocket)
* approx 38 cm of elastic per leg and 12 cm for the PUL at the back and 12 cm for the microfleece at the back (if you want the fleece elasticated too), so that's approx 1 m of elastic (note, I tend to find that I use less lastin as it stretches further and returns to its original length better)
* approx 40 cm of loop and 10 cm of hook OR 16 socket snaps and 6 stud snaps
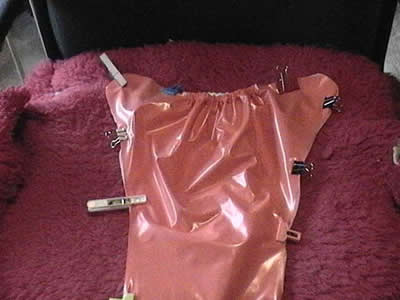
Step 1: Layering your pieces and sewing at the tummy
Lay the microfleece right side up, then lay the PUL right side down, and the scrap reinforcement layer on top of the PUL.
Lay the microfleece right side up, then lay the PUL right side down, and the scrap reinforcement layer on top of the PUL.
TIP: Use bull dog clips or spring clothes pegs to secure your layers (the few number of pin holes, the better).
Sew along the top to secure all 3 layers.

Step 2: Adding snaps or loop tape to the tummyAdd the velcro or snaps to the PUL & reinforcement layer (I'll make a velcro one and add photos later).

Step 3 Sewing in elastic on the backSew the back elastic onto the PUL (and the microfleece if you want - I prefer the microfleece elasticated as well as it keep the insert in better and I think it looks nicer).
There are a number of ways to do this. I prefer to cut the elastic first so that I know I'm doing both the fleece and PUL the same length (I did the fleece looser than the PUL once - wasn't happy with how it gaped). This is the way I do it:
1. Cut the elastic to the required length (I stretch it from one end of the rectangle bit to the other end)
2. Use a few stitches to secure the elastic to the PUL at each end of the rectangle.

3. Fold the rectangle flap over the elastic. Sew down the folded over flap bit (securing the elastic, again), then do a right angle turn to sew along the PUL, being careful to sew next to the elastic (you don't want the elastic caught in the stitches).

4. At the other end, do a right angle up to the edge to secure the elastic again

Sew around the rest of the nappy (I start where the back elastic ends and sew down to where the snaps are. Then, start on the other side of the elastic bit, and down to the snaps on the other side.) If your machine doesn't feed fabric through very well, you may struggle with this step as the PUL can be slippery. I find the ProCare Barrier Fabric PUL less slippery than the Fabrite PUL. A walking foot will help with sewing PUL. I also find that some

Step 5: The leg elasticFold the pocket in half, lay on your pattern and use pins to mark the start and finish of the leg elastic on both sides (I fold in half so that I have even legs - it doesn't really matter if the elastic starts or finishes a bit high or low, but I do think it looks better if it starts/ends in the same place on both legs).

I prefer to use Lastin (clear elastic). I sew it to the microfleece side of the pocket (apparently it helps the softer fleece roll outwards on the leg).
Use the pin to attach the lastin to the pocket. Using a 3 step zig-zag (forward and reverse) secure the lastin at the start pin. Then, while stretching the lastin, sew down the leg until you reach the end pin. Secure with forward and reverse sewing. Cut the lastin and threads.

Do the other side of the leg.
Nearly there!
Here's the fleece side (inside out)
Here's the fleece side (inside out)
Here's the PUL side (inside out)

Trim any edges/threads - you are now ready to turn it right side out!
Step 6: The finishing touches...
You need to sew on hook tape to the arms (or add stud snaps as I have done). You can oversew the edges if you like, I don't bother as it's extra work and likely to increasing wicking issues.
You need to sew on hook tape to the arms (or add stud snaps as I have done). You can oversew the edges if you like, I don't bother as it's extra work and likely to increasing wicking issues.
I also reinforce the back opening by sewing over (perpendicular to) the elastic, over the microfleece and PUL layer together.

FINISHED! Easy peasy! (and no overlocker needed)
Here's a photo of Em's new pocket done up on the tightest setting (I've added the extra socket for crossover).

And on the largest setting (not very flattering - the rise would probably be a bit on the short side, too).

Nappy statistics:* Rise is 47 cm
* Waist with snaps in current positions: 30 - 56 cm
* Thigh with snaps in current positions: 24 - 35 cm
* Waist with snaps in current positions: 30 - 56 cm
* Thigh with snaps in current positions: 24 - 35 cm
Extra note about making a fleece & waterproof layer nappy...
Using PUL is probably easier, as I find working with the extra layer (and sometimes more slippery waterproof nylon) a bit fiddlier. Cost wise too, Shar & I worked out that it probably isn't any cheaper, and depending on your sources/specials possibly dearer (but you can use some cutey fleece prints). To make a fleece/nylon pocket use the instructions as above as though they were one layer, except you don't need the reinforcing scrap layer for the tummy loop/snaps.
Using PUL is probably easier, as I find working with the extra layer (and sometimes more slippery waterproof nylon) a bit fiddlier. Cost wise too, Shar & I worked out that it probably isn't any cheaper, and depending on your sources/specials possibly dearer (but you can use some cutey fleece prints). To make a fleece/nylon pocket use the instructions as above as though they were one layer, except you don't need the reinforcing scrap layer for the tummy loop/snaps.